Session Two: gitHub, Functions, Booleans and Modules
Review/Questions
- Values and Types
- Expressions
- Intro to functions
Homework Review
Any questions that are nagging?
Lightning Talks Today:
Class Outline
- git / gitHub primer
- Exercise: Grid Printer Exercise
- Decisions, Decisions.
- Exercise: Fizz Buzz Exercise
- More on functions
- Exercise: Fibonacci Series Exercise
- Boolean Expressions
- Code Structure, Modules, and Namespaces
First a little git Primer...
Let’s get to know git a bit

What is git?
A “version control system”
A history of everything everyone does to your code
A graph of states in which the code has existed
That last one is a bit tricky, and is not necessary to understand right out of the gate. When you are ready, you can look at this supplement to gain a better understanding:
Setting up git
You should have git installed on your machine and accessible from the command line. There will be a little bit of setup for git that you should only have to do once.
$ git config --global user.name "Marie Curie"
$ git config --global user.email "marie@radioactive.com"
Editor
You will never have to use an editor with git for anything extensive, so a simple editor is fine. Unfortunately, the default, VI, is not intuitive to new users. So, unless you already know vi, you should set up a different editor. Nano is a straight-forward, simple editor, available out of the box on Macs and Linux boxes, but needs to be installed on Windows (or you can use sublime or Notepad++ as shown in link below). To install nano on Windows: Installing Nano on Windows
Once you have chosen/installed an editor, configure git to use it:
nano
$ git config --global core.editor "nano -w"
sublime (mac)
$ git config --global core.editor "subl -n -w"
sublime (win)
$ git config --global core.editor "'c:/program files/sublime text 2/sublime_text.exe' -w"
Notepad++ (Win)
$ git config --global core.editor "'c:/program files (x86)/Notepad++/notepad++.exe' -multiInst -notabbar -nosession -noPlugin"
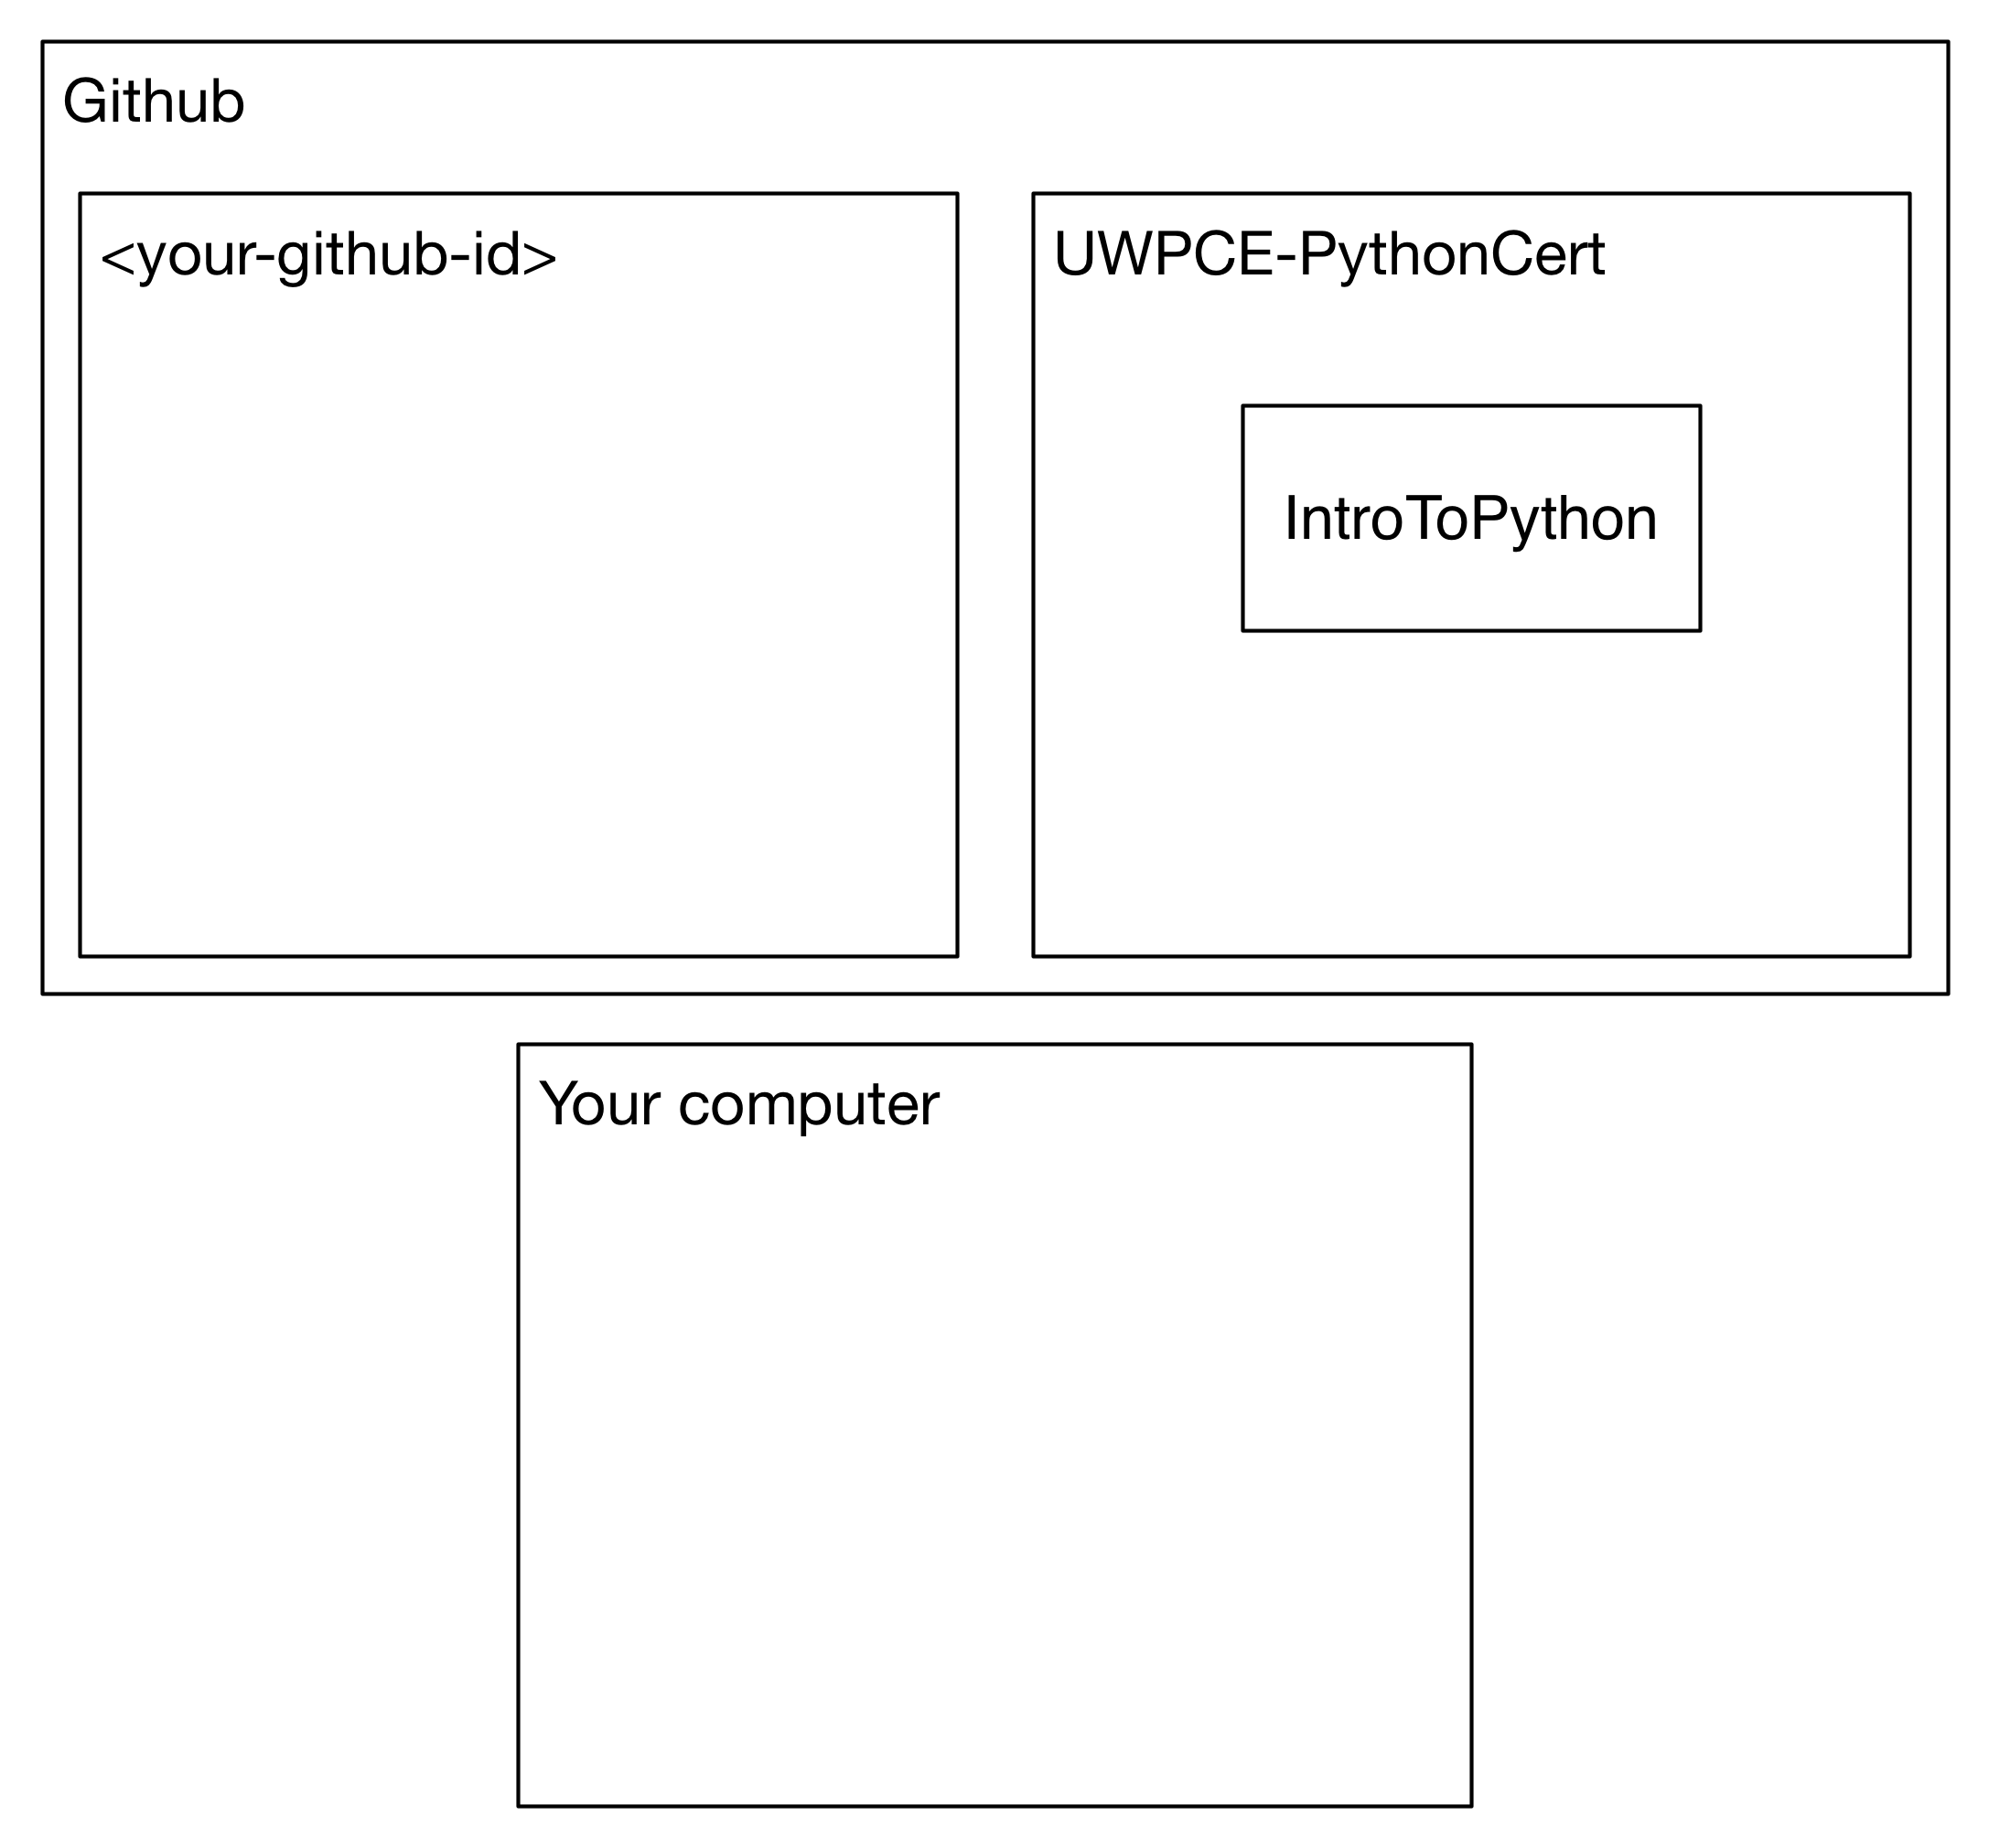
Repositories
A repository is just a collection of files that ‘belong together’.
Since git is a distributed versioning system, there is no central
repository that serves as the one to rule them all. This simply means that all repositories should look the same.
However, to keep things sane, there is generally one repository chosen that users check with for changes, for us this is GitHub.
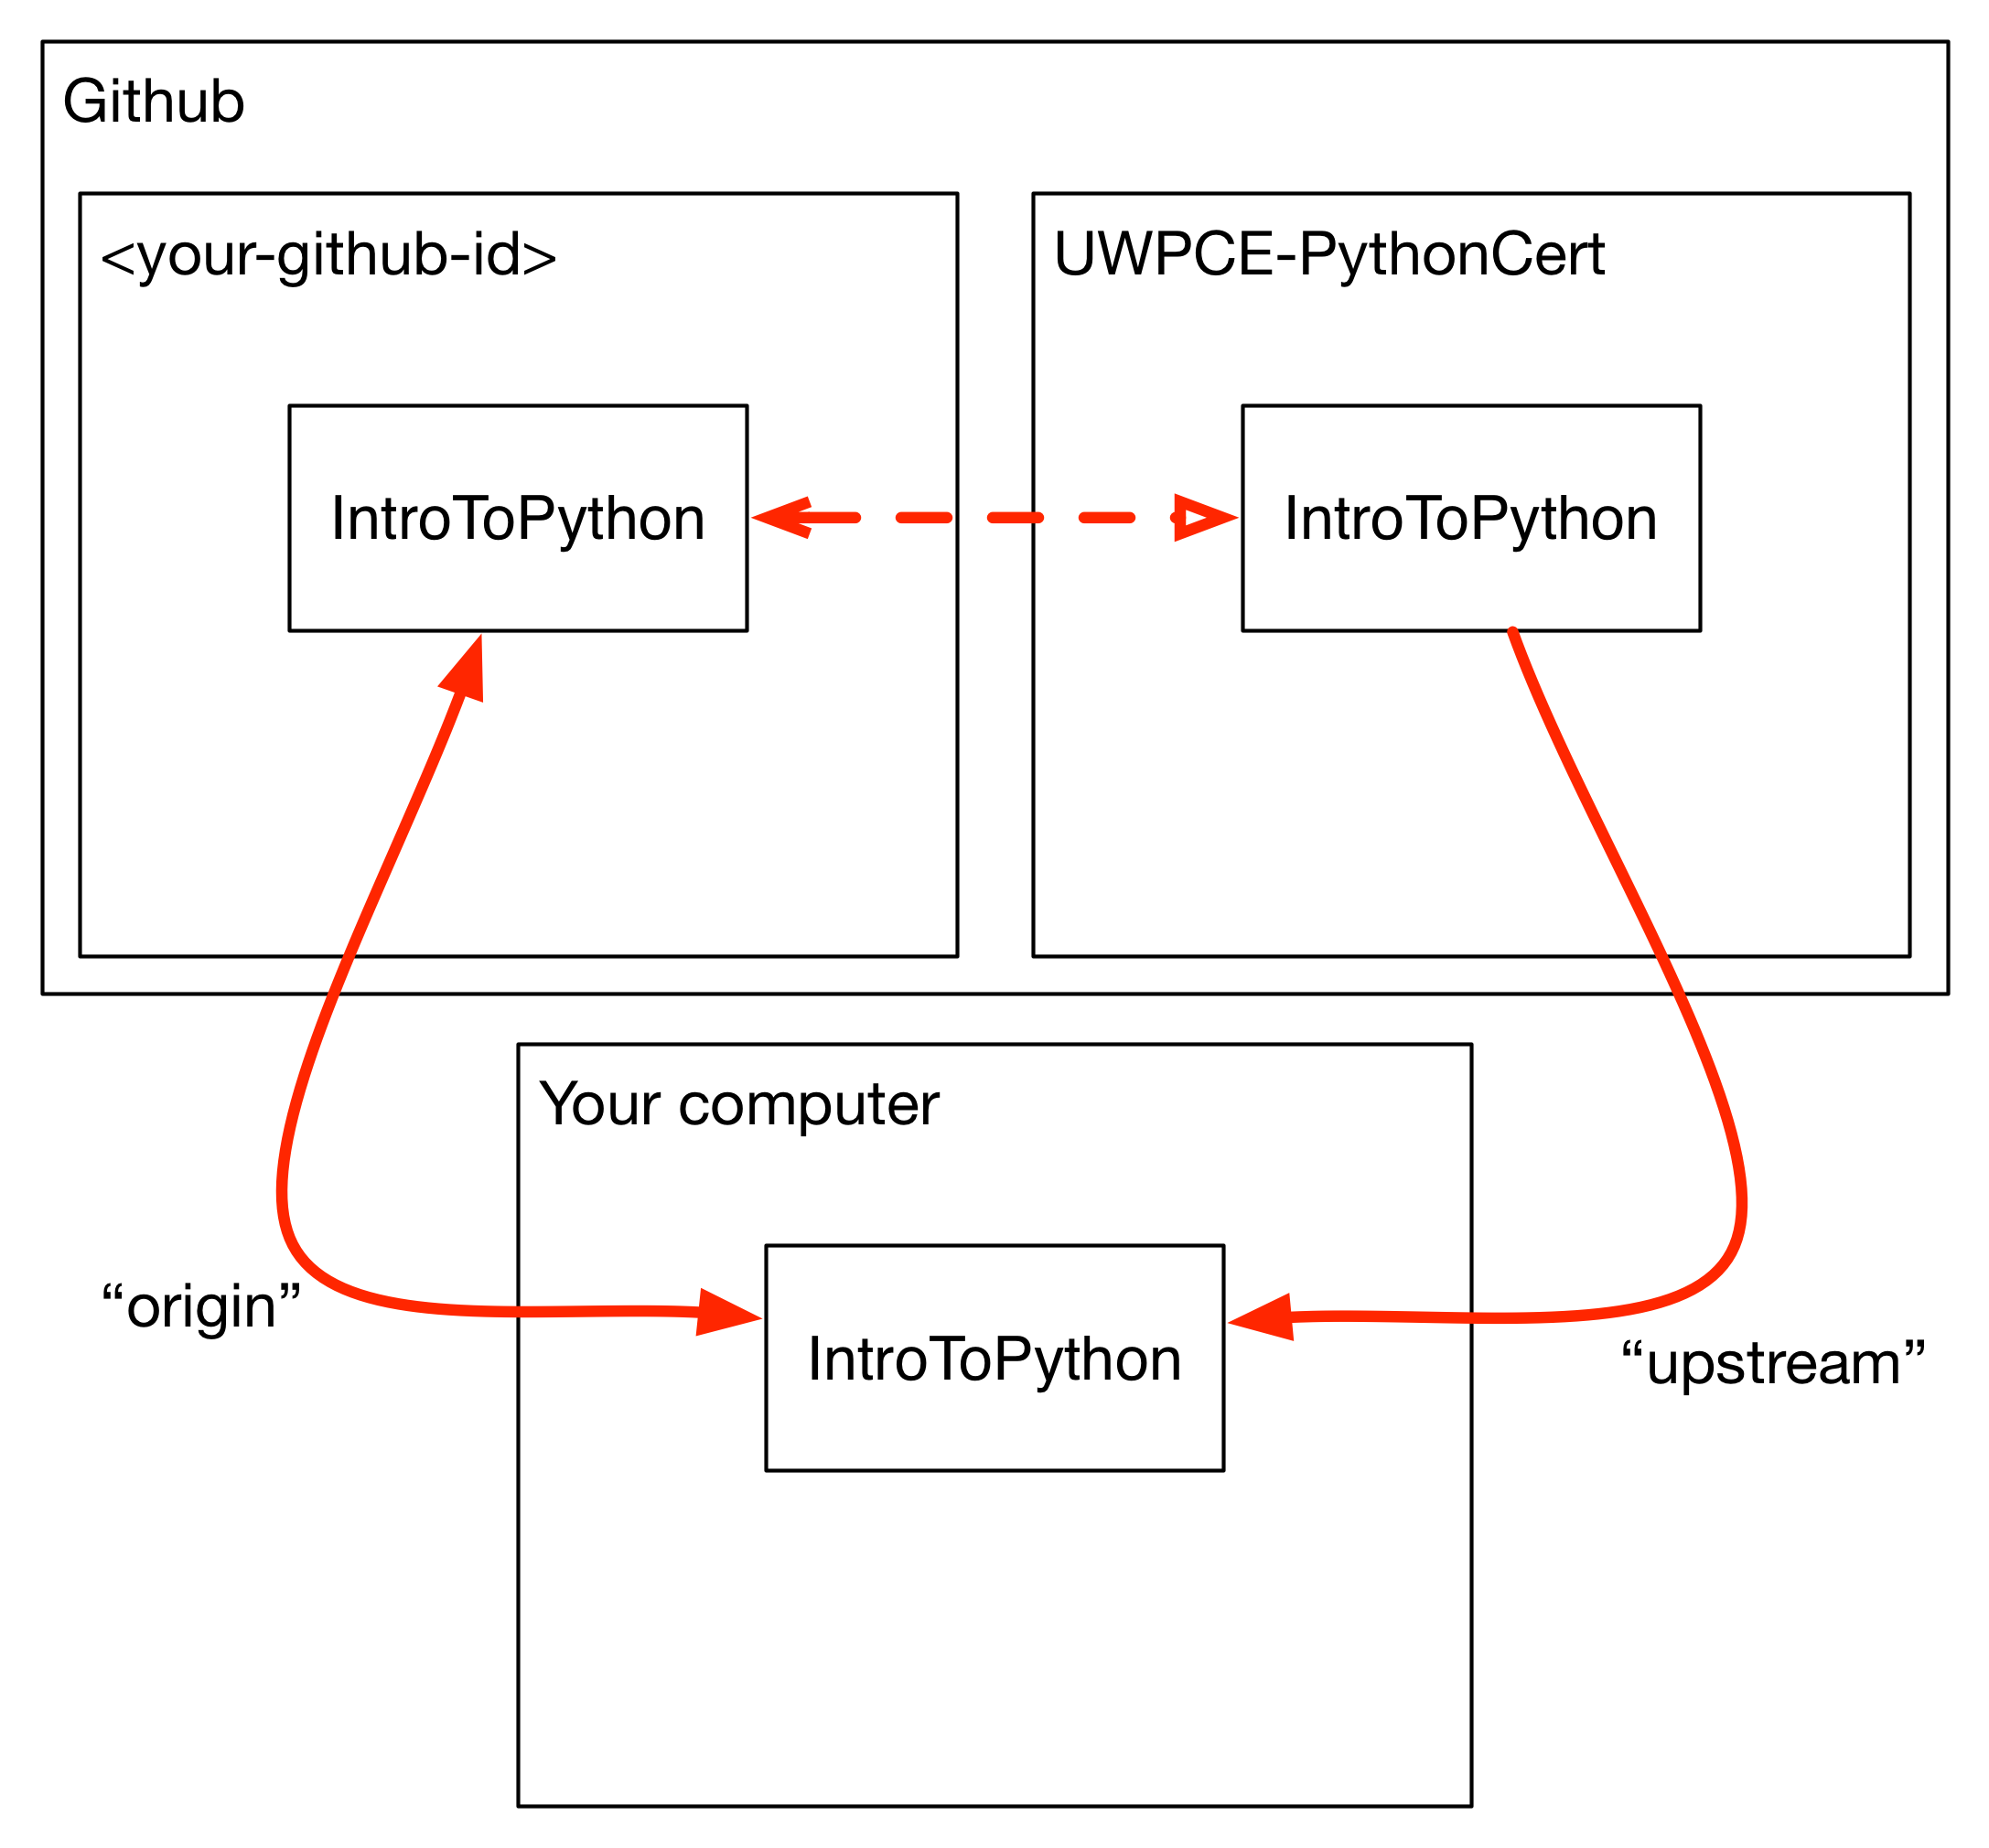
Working with Remotes
With git, you work with local repositories and remotes that they are connected to.
Git uses shortcuts to address remotes. Cloned repositories get an origin shortcut for free:
$ git remote -v
origin  https://github.com/UWPCE-PythonCert/IntroPython2016a (fetch)
origin  https://github.com/UWPCE-PythonCert/IntroPython2016a (push)
This shows that the local repo on my machine originated from the one in the UWPCE-PythonCert gitHub account (don’t worry that it shows it twice, they should be the same)
You can work on any project you wish to that has a public repository on Github. However, since you won’t have permission to edit most projects directly, there is such a thing as forking a project.
When you fork a repository, you make a copy of that repository in your own (Github) account.
When you have made changes that you believe the rest of the community will want to adopt, you make a pull request to the original project. The maintainer(s) of that project than have the option of accepting your changes, in which case your changes will become part of that project.
This is how we will be working in this class. When you want feedback on your work, you will make a pull request to the instructors.
Our class materials reside in a repository on Github in the UWPCE-PythonCert organization:
We will do a live demo of setting up a machine. Please follow along.
We will now create a fork of the class repository from the UWPCE-PythonCert
account on GitHub into your personal account. This is done on the GitHub website.

The next step is to make a clone of your fork on your own computer, which means that your fork in github is the origin (Demo):

We will now set up our individual folders and include a README in this folder. In your terminal, cd into the students directory in the directory created when we made the clone, which may or may not be called IntroPython2015.
$ cd IntroPython2015/students
$ git status
$ git pull origin master
$ mkdir maria_mckinley
$ cd maria_mckinley
$ echo "# Python code for UWPCE-PythonCert class" >> README.rst
Check the status
$ git status
Add anything you want to commit to your commit:
$ git add README.rst
Make your commit:
$ git commit -m 'added a readme file'
Push your changes:
$ git push origin master
Go onto GitHub, and make a pull request!
You’ve pushed your own changes to that fork, and then issued pull requests to have that worked merged back to the UWPCE-PythonCert original.
You want to keep your fork up-to-date with that original copy as the class goes forward.
To do this, you add a new remote repository to your local clone.
You can add remotes at will, to connect your local repository to other copies of it in different remote locations.
When you add a remote (existing git repository), it creates a directory with the name of the repository at the top level.
This allows you to grab changes made to the repository in these other locations.
For our class, we will add an upstream remote to our local copy that points
to the original copy of the material in the UWPCE-PythonCert account.
$ git remote add upstream https://github.com/UWPCE-PythonCert/IntroPython2016a.git

$ git remote -v
origin https://github.com/UWPCE-PythonCert/IntroPython2016a.git (fetch)
origin https://github.com/UWPCE-PythonCert/IntroPython2016a.git (push)
upstream https://github.com/UWPCE-PythonCert/IntroPython2016a.git (fetch)
upstream https://github.com/UWPCE-PythonCert/IntroPython2016a.git (push)
This should leave you in a situation that looks like this:
To get the updates from your new remote, you’ll need first to fetch everything:
$ git fetch --all
Fetching origin
Fetching upstream
...
Then you can see the branches you have locally available:
$ git branch -a
* master
  remotes/origin/HEAD -> origin/master
  remotes/origin/master
  remotes/upstream/master
Finally, you can fetch and then merge changes from the upstream master.
Start by making sure you are on your own master branch:
$ git checkout master
This is really really important. Take the time to ensure you are where you think you are, in other words, not on a remote. Use git status to see where you are.
Then, fetch the upstream master branch and merge it into your master:
$ git fetch upstream master
From https://github.com/UWPCE-PythonCert/IntroPython2015
 * branch            master     -> FETCH_HEAD

$ git merge upstream/master
Updating 3239de7..9ddbdbb
Fast-forward
 Examples/README.rst              |  4 ++++
...
 create mode 100644 Examples/README.rst
...
NOTE: you can do that in one step with:
$ git pull upstream master
Now all the changes from upstream are present in your local clone. You should do this pull everytime you start to work on code.
In order to preserve them in your fork on GitHub, you’ll have to push:
$ git status
On branch master
Your branch is ahead of 'origin/master' by 10 commits.
  (use "git push" to publish your local commits)
$ git push origin master
Counting objects: 44, done.
...
$
(A simple git push will usually do the right thing)
You can incorporate this into your daily workflow:
$ git checkout master
$ git pull upstream master
$ git push
[do some work]
$ git commit -a 'I wrote some Python.'
[add a good commit message]
$ git push
[make a pull request on the GitHub website]
Because of the way we have set up the class, you will be able to see all work submitted to us from everyone in the class in the students directory on your machine. This is not a bad thing. The files tend to be small.
We encourage sharing of knowledge in this class. Helping your fellow students will also help you to better understand. Share your code, and get used to giving and receiving feedback on how to improve your code, if you are not already.
LAB: Grid Printer
With only the ability to do a bit with numbers and text, you should be able to do this little project:
Getting Started:
Lets use git and gitHub to manage this project:
Start by putting a python file in your clone of the class gitHub project:
$ cd my_personal_directory
$ mkdir session_02
$ cd session_02
$ touch grid_printer.py
$ git add grid_printer.py
Then put your code in grid_printer.py
Committing your code
When your code does something useful, you can commit it.
First check the status:
$ git status
If it’s what you expect, you can commit and push:
$ git commit -a -m "first version"
$ git push
And when you want us to take a look, you can go to gitHub and do a “Pull Request” (make sure you commit and push first)
Committing your code
Commit early and often.
Lightning Talk:
Beyond Printing
Because there’s a few things you just gotta have
Basics
You really can’t really do much at all without at least conditionals, looping, and a container type...
Making a Decision
“Conditionals”
if and elif (else if) allow you to make decisions:
if a:
    print('a')
elif b:
    print('b')
elif c:
    print('c')
else:
    print('that was unexpected')
What’s the difference between these two?
if a:
    print('a')
elif b:
    print('b')

## versus...
if a:
    print('a')
if b:
    print('b')
Lists
A way to store a bunch of stuff in order
Pretty much like an “array” or “vector” in other languages
a_list = [2,3,5,9]
a_list_of_strings = ['this', 'that', 'the', 'other']
You can put any type of object in a list...
Tuples
Another way to store an ordered list of things
a_tuple = (2,3,4,5)
a_tuple_of_strings = ('this', 'that', 'the', 'other')
You can also put any type of object in a tuple... (sense a theme here?)
Tuples are not the same as lists.
The exact difference is a topic for next session.
for loops
Sometimes called a ‘determinate’ loop
When you need to do something to all the objects in a sequence
In [10]: a_list = [2,3,4,5]

In [11]: for item in a_list:
   ....:     print(item)
   ....:
2
3
4
5
range builds sequences of numbers automatically
Use it when you need to do something a set number of times
In [31]: for i in range(4):
    print('*', end=' ')
   ....:
* * * *
NOTE: range(n) creates an “iterable” – something you can loop over
– more on that later.
Intricacies
This is enough to get you started.
Each of these have intricacies special to python
We’ll get to those over the next couple of classes
LAB: Fizz Buzz
We now have the tools to do a implementation of the classic “Fizz Buzz” problem:
Do the same git / gitHub dance with this, too!
Lightning Talk:
More on Functions
Local vs. Global
Names bound in Python have a scope
That scope determines where a symbol is visible, or what value it has in a given block.
In [14]: x = 32
In [15]: y = 33
In [16]: z = 34
In [17]: def fun(y, z):
   ....:     print(x, y, z)
   ....:
In [18]: fun(3, 4)
32 3 4
x is global, y and z local to the function
But, did the value of y and z change in the global scope?
In [19]: y
Out[19]: 33

In [20]: z
Out[20]: 34
In general, you should use global bindings mostly for constants.
The python convention is to designate global constants by typing the symbols we bind to them in ALL_CAPS
INSTALLED_APPS = [u'foo', u'bar', u'baz']
CONFIGURATION_KEY = u'some secret value'
...
This is just a convention, but it’s a good one to follow.
Global Gotcha
Take a look at this function definition:
In [21]: x = 3

In [22]: def f():
   ....:     y = x
   ....:     x = 5
   ....:     print(x)
   ....:     print(y)
   ....:
What is going to happen when we call f
Try it and see:
In [34]: f()
---------------------------------------------------------------------------
UnboundLocalError                         Traceback (most recent call last)
<ipython-input-34-0ec059b9bfe1> in <module>()
----> 1 f()

<ipython-input-33-4363b2b69f73> in f()
      1 def f():
----> 2     y = x
      3     x = 5
      4     print(x)
      5     print(y)

UnboundLocalError: local variable 'x' referenced before assignment
Because you are binding the symbol x locally, it becomes a local and masks
the global value already bound.
Parameters
So far we’ve seen simple parameter lists:
def fun(x, y, z):
    print(x, y, z)
These types of parameters are called positional
When you call a function, you must provide arguments for all positional parameters in the order they are listed
You can provide default values for parameters in a function definition:
In [24]: def fun(x=1, y=2, z=3):
   ....:     print(x, y, z)
   ....:
When parameters are given with default values, they become optional
In [25]: fun()
1 2 3
You can provide arguments to a function call for optional parameters positionally:
In [26]: fun(6)
6 2 3
In [27]: fun(6, 7)
6 7 3
In [28]: fun(6, 7, 8)
6 7 8
Or, you can use the parameter name as a keyword to indicate which you mean:
In [29]: fun(y=4, x=1)
1 4 3
Once you’ve provided a keyword argument in this way, you can no longer provide any positional arguments:
In [30]: fun(x=5, 6)
  File "<ipython-input-30-4529e5befb95>", line 1
    fun(x=5, 6)
SyntaxError: non-keyword arg after keyword arg
Documentation
It’s often helpful to leave information in your code about what you were thinking when you wrote it.
This can help reduce the number of WTFs per minute in reading it later.
There are two approaches to this:
- Comments
- Docstrings
Comments go inline in the body of your code, to explain reasoning:
if (frobnaglers > whozits):
    # borangas are shermed to ensure frobnagler population
    # does not grow out of control
    sherm_the_boranga()
You can use them to mark places you want to revisit later:
for partygoer in partygoers:
    for balloon in balloons:
        for cupcake in cupcakes:
            # TODO: Reduce time complexity here.  It's killing us
            #  for large parties.
            resolve_party_favor(partygoer, balloon, cupcake)
Be judicious in your use of comments.
Use them when you need to.
Make them useful.
This is not useful:
for sponge in sponges:
    # apply soap to each sponge
    worker.apply_soap(sponge)
Note: Nothing special about Python here – basic good programing practice.
Docstrings
In Python, docstrings are used to provide in-line documentation in a number of places.
The first place we will see is in the definition of functions.
To define a function you use the def keyword.
If a string literal is the first thing in the function block following the
header, it is a docstring:
def complex_function(arg1, arg2, kwarg1=u'bannana'):
    """Return a value resulting from a complex calculation."""
    # code block here
You can then read this in an interpreter as the __doc__ attribute of the
function object.
A docstring should:
- Be a complete sentence in the form of a command describing what the function
does.
- “”“Return a list of values based on blah blah”“” is a good docstring
- “”“Returns a list of values based on blah blah”“” is not
- Have a useful single line.
- If more description is needed, make the first line a complete sentence and add more lines below for enhancement.
- Be enclosed with triple-quotes.
- This allows for easy expansion if required at a later date
- Always close on the same line if the docstring is only one line.
For more information see PEP 257: Docstring Conventions.
Recursion
You’ve seen functions that call other functions.
If a function calls itself, we call that recursion
Like with other functions, a call within a call establishes a call stack
With recursion, if you are not careful, this stack can get very deep.
Python has a maximum limit to how much it can recurse. This is intended to save your machine from running out of RAM.
Recursion is especially useful for a particular set of problems.
For example, take the case of the factorial function.
In mathematics, the factorial of an integer is the result of multiplying that integer by every integer smaller than it down to 1.
5! == 5 * 4 * 3 * 2 * 1
We can use a recursive function nicely to model this mathematical function
assert
Writing tests that demonstrate that your program works is an important part of learning to program.
The python assert statement is useful in writing simple tests
for your code.
In [1]: def add(n1, n2):
   ...:     return n1 + n2
   ...:

In [2]: assert add(3, 4) == 7

In [3]: assert add(3, 4) == 10

---------------------------------------------------------------------
AssertionError                     Traceback (most recent call last)
<ipython-input-3-6731d4ac4476> in <module>()
----> 1 assert add(3, 4) == 10

AssertionError:
Boolean Expressions
Truthiness
What is true or false in Python?
- The Booleans:
TrueandFalse - “Something or Nothing”
- http://mail.python.org/pipermail/python-dev/2002-April/022107.html
Determining Truthiness:
bool(something)
What is False?
NoneFalseNothing:
- Zero of any numeric type:
0, 0L, 0.0, 0j. - Any empty sequence, for example,
"", (), []. - Any empty mapping, for example,
{}. - Instances of user-defined classes, if the class defines a
__nonzero__()or__len__()method, when that method returns the integer zero or bool valueFalse.
- Zero of any numeric type:
What is True?
Everything Else
Pythonic Booleans
Any object in Python, when passed to the bool() type object, will
evaluate to True or False.
When you use the if keyword, it automatically does this to the expression provided.
Which means that this is redundant, and not Pythonic:
if xx == True:
    do_something()
# or even worse:
if bool(xx) == True:
    do_something()
Instead, use what Python gives you:
if xx:
    do_something()
and, or and not
Python has three boolean keywords, and, or and not.
and and or are binary expressions, and evaluate from left to right.
and will return the first operand that evaluates to False, or the last
operand if none are True:
In [35]: 0 and 456
Out[35]: 0
or will return the first operand that evaluates to True, or the last
operand if none are True:
In [36]: 0 or 456
Out[36]: 456
On the other hand, not is a unary expression and inverts the boolean value
of its operand:
In [39]: not True
Out[39]: False

In [40]: not False
Out[40]: True
Because of the return value of these keywords, you can write concise statements:
                  if x is false,
x or y               return y,
                     else return x

                  if x is false,
x and y              return  x
                     else return y

                  if x is false,
not x                return True,
                     else return False
a or b or c or d
a and b and c and d
The first value that defines the result is returned
Ternary Expressions
This is a fairly common idiom:
if something:
    x = a_value
else:
    x = another_value
In other languages, this can be compressed with a “ternary operator”:
result = a > b ? x : y;
In python, the same is accomplished with the ternary expression:
y = 5 if x > 2 else 3
PEP 308: (http://www.python.org/dev/peps/pep-0308/)
Boolean Return Values
Remember this puzzle from the CodingBat exercises?
def sleep_in(weekday, vacation):
    if weekday == True and vacation == False:
        return False
    else:
        return True
Though correct, that’s not a particularly Pythonic way of solving the problem.
Here’s a better solution:
def sleep_in(weekday, vacation):
    return not (weekday == True and vacation == False)
And here’s an even better one:
def sleep_in(weekday, vacation):
    return (not weekday) or vacation
In python, the boolean types are subclasses of integer:
In [1]: True == 1
Out[1]: True
In [2]: False == 0
Out[2]: True
And you can even do math with them (though it’s a bit odd to do so):
In [6]: 3 + True
Out[6]: 4
LAB: Booleans
Working with Booleans, Ternary Expressions, etc:
Re-write a couple CodingBat exercises, returning the direct boolean results, and/or using ternary expressions.
Experiment with locals by adding this statement one of the functions you wrote today:
print(locals())
Code Structure, Modules, and Namespaces
How to get what you want when you want it.
Code Structure
In Python, the structure of your code is determined by whitespace.
How you indent your code determines how it is structured
block statement:
    some code body
    some more code body
    another block statement:
        code body in
        that block
The colon that terminates a block statement is also important...
You can put a one-liner after the colon:
In [167]: x = 12
In [168]: if x > 4: print(x)
12
But this should only be done if it makes your code more readable.
Whitespace is important in Python.
An indent could be:
- Any number of spaces
- A tab
- A mix of tabs and spaces:
If you want anyone to take you seriously as a Python developer:
Always use four spaces – really!
Other than indenting – space doesn’t matter, technically.
x = 3*4+12/func(x,y,z)
x = 3*4 + 12 /   func (x,   y, z)
But you should strive for proper style. Read PEP 8 and install a linter in your editor.
Modules and Packages
Python is all about namespaces – the “dots”
name.another_name
The “dot” indicates that you are looking for a name in the namespace of the given object. It could be:
- name in a module
- module in a package
- attribute of an object
- method of an object
A module is simply a namespace.
It might be a single file, or it could be a collection of files that define a shared API.
To a first approximation, you can think of the files you write that end in
.py as modules.
A package is a module with other modules in it.
On a filesystem, this is represented as a directory that contains one or more
.py files, one of which must be called __init__.py.
When you have a package, you can import the package, or any of the modules inside it.
import modulename
from modulename import this, that
import modulename as a_new_name
from modulename import this as that
importing from packages
import packagename.modulename
from packagename.modulename import this, that
from package import modulename
http://effbot.org/zone/import-confusion.htm
from modulename import *
Don’t do this!
import
When you import a module, or a symbol from a module, the Python code is compiled to bytecode.
The result is a module.pyc file.
Then after compiling, all the code in the module is run at the module scope.
For this reason, it is good to avoid module-scope statements that have global side-effects.
Re-import
The code in a module is NOT re-run when imported again
It must be explicitly reloaded to be re-run
import modulename
reload(modulename)
In addition to importing modules, you can run them.
There are a few ways to do this:
$ python hello.py– must be in current working directory$ python -m hello– any module on PYTHONPATH anywhere on the system$ ./hello.py– put#!/usr/env/pythonat top of module (Unix)In [149]: run hello.py– at the IPython prompt – running a module brings its names into the interactive namespace
Like importing, running a module executes all statements at the module level.
But there’s an important difference.
When you import a module, the value of the symbol __name__ in the module
is the same as the filename.
When you run a module, the value of the symbol __name__ is __main__.
This allows you to create blocks of code that are executed only when you run a module
if __name__ == '__main__':
    # Do something interesting here
    # It will only happen when the module is run
This is useful in a number of cases.
You can put code here that lets your module be a utility script
You can put code here that demonstrates the functions contained in your module
You can put code here that proves that your module works.
Import Interactions
Let’s experiment with importing different ways:
In [3]: import math

In [4]: math.<TAB>
math.acos       math.degrees    math.fsum       math.pi
math.acosh      math.e          math.gamma      math.pow
math.asin       math.erf        math.hypot      math.radians
math.asinh      math.erfc       math.isinf      math.sin
math.atan       math.exp        math.isnan      math.sinh
math.atan2      math.expm1      math.ldexp      math.sqrt
math.atanh      math.fabs       math.lgamma     math.tan
math.ceil       math.factorial  math.log        math.tanh
math.copysign   math.floor      math.log10      math.trunc
math.cos        math.fmod       math.log1p
math.cosh       math.frexp      math.modf
In [6]: math.sqrt(4)
Out[6]: 2.0
In [7]: import math as m
In [8]: m.sqrt(4)
Out[8]: 2.0
In [9]: from math import sqrt
In [10]: sqrt(4)
Out[10]: 2.0
Experiment with importing different ways:
import sys
print sys.path
import os
print os.path
You wouldn’t want to import * those!
– check out
os.path.split('/foo/bar/baz.txt')
os.path.join('/foo/bar', 'baz.txt')
Next Class
- Sequences
- Iteration
- Strings and String Formatting
- Lightning talks by:
Office hours: 10 a.m. to noon on Sundays
Homework
Review and/or finish reading these class notes.
Finish any labs from class....
Reading:
Think Python, chapters 8, 9, 10, 12
(http://greenteapress.com/thinkpython/html/thinkpython009.html)
Learn Python the Hard way: exercises 11 – 14, 18, 19, 21, 28-33 (the ones in between are about files – we’ll get to that later.)
http://learnpythonthehardway.org/book/ex11.html
NOTE: In python3, you use input, rather than raw_input
Dive Into Python: chapter 4