Intro to Git
What is Git?
A “version control system”
Why Version Control?

“Piled Higher and Deeper” by Jorge Cham: www.phdcomics.com
A history of everything everyone does to ‘your’ code
A graph of “states” in which the code has existed
That last one is a bit tricky, and is not necessary to understand right out of the gate. When you are ready, you can look at this supplement to gain a better understanding:
There are other versioning systems, such as Mercurial and Subversion (and commercial offerings), but Git is the most popular.
It is incredibly important to learn and understand version control to work as a developer today, so we have incorporated Git into our work flow for submitting students’ work in this class.
Setting up Git
You should have git installed on your machine and accessible from the command line. If you don’t have git working on the command line, revisit the appropriate instructions for your platform here: Installing Python and core tools.
Once git is installed and working, there is a little bit of setup for git that you should only have to do once:
Letting git know your identity
$ git config --global user.name "Marie Curie"
$ git config --global user.email "marie@radioactive.com"
(using your email and name, of course)
Editor
- git needs an editor occasionally
- default is VI, which is not very intuitive to non-Unix Geeks
- Nano is simple, easy solution for Macs and Linux
- Nano no longer available for windows, use Sublime Text or Notepad++ or Atom
For windows users: Making your text Editor work with git on Windows
Once you have chosen/installed an editor, configure git to use it:
(full notes here: GitHub help on Editors)
nano:
$ git config --global core.editor "nano -w"
Sublime Text (mac):
$ git config --global core.editor "subl -n -w"
Sublime Text(win):
$ git config --global core.editor "'c:/program files/sublime text 2/sublime_text.exe' -w"
Notepad++ (Win):
$ git config --global core.editor "'c:/program files (x86)/Notepad++/notepad++.exe' -multiInst -notabbar -nosession -noPlugin"
Atom:
git config --global core.editor "atom --wait"
Repositories
A repository is just a collection of files that ‘belong together’.
Since git is a distributed versioning system, there is no primary
repository that serves as the one to rule them all. This simply means that all repositories on each users machine should look the same.
However, to keep things sane, there is generally one “central” repository chosen that users check with for changes. For us this is the one hosted on GitHub in the UWPCE-PythonCert-ClassRepos organization.
Working with Remotes
With git, you work with local repositories and the remotes that they are connected to.
Git uses shortcuts to address remotes. When you clone a repository from its remote location to your local machine, you get an origin shortcut for free:
$ git remote -v
origin  https://github.com/UWPCE-PythonCert-ClassRepos/ExampleRepo.git (fetch)
origin  https://github.com/UWPCE-PythonCert-ClassRepos/ExampleRepo.git (push)
This shows that the local repo on my machine originated from one in
the UWPCE-PythonCert-ClassRepos GitHub account (it shows up twice, because there is a shortcut for both fetch from and push to this remote).
GitHub forks
You can work on any project you wish to that has a public repository on GitHub. However, since you won’t have permission to edit most projects directly, there is such a thing as forking a project.
When you fork a repository, you make a copy of that repository in your own (GitHub) account.
When you have made changes that you believe the rest of the community will want to adopt, you make a pull request to the original project. The maintainer(s) of that project than have the option of accepting your changes, in which case your changes will become part of that project.
This is how we will be working in this class. When you are ready to submit an assignment, you will make a pull request to main class repo, and your instructors can review it.
The class repositories are on GitHub in the UWPCE-PythonCert-ClassRepos organization:
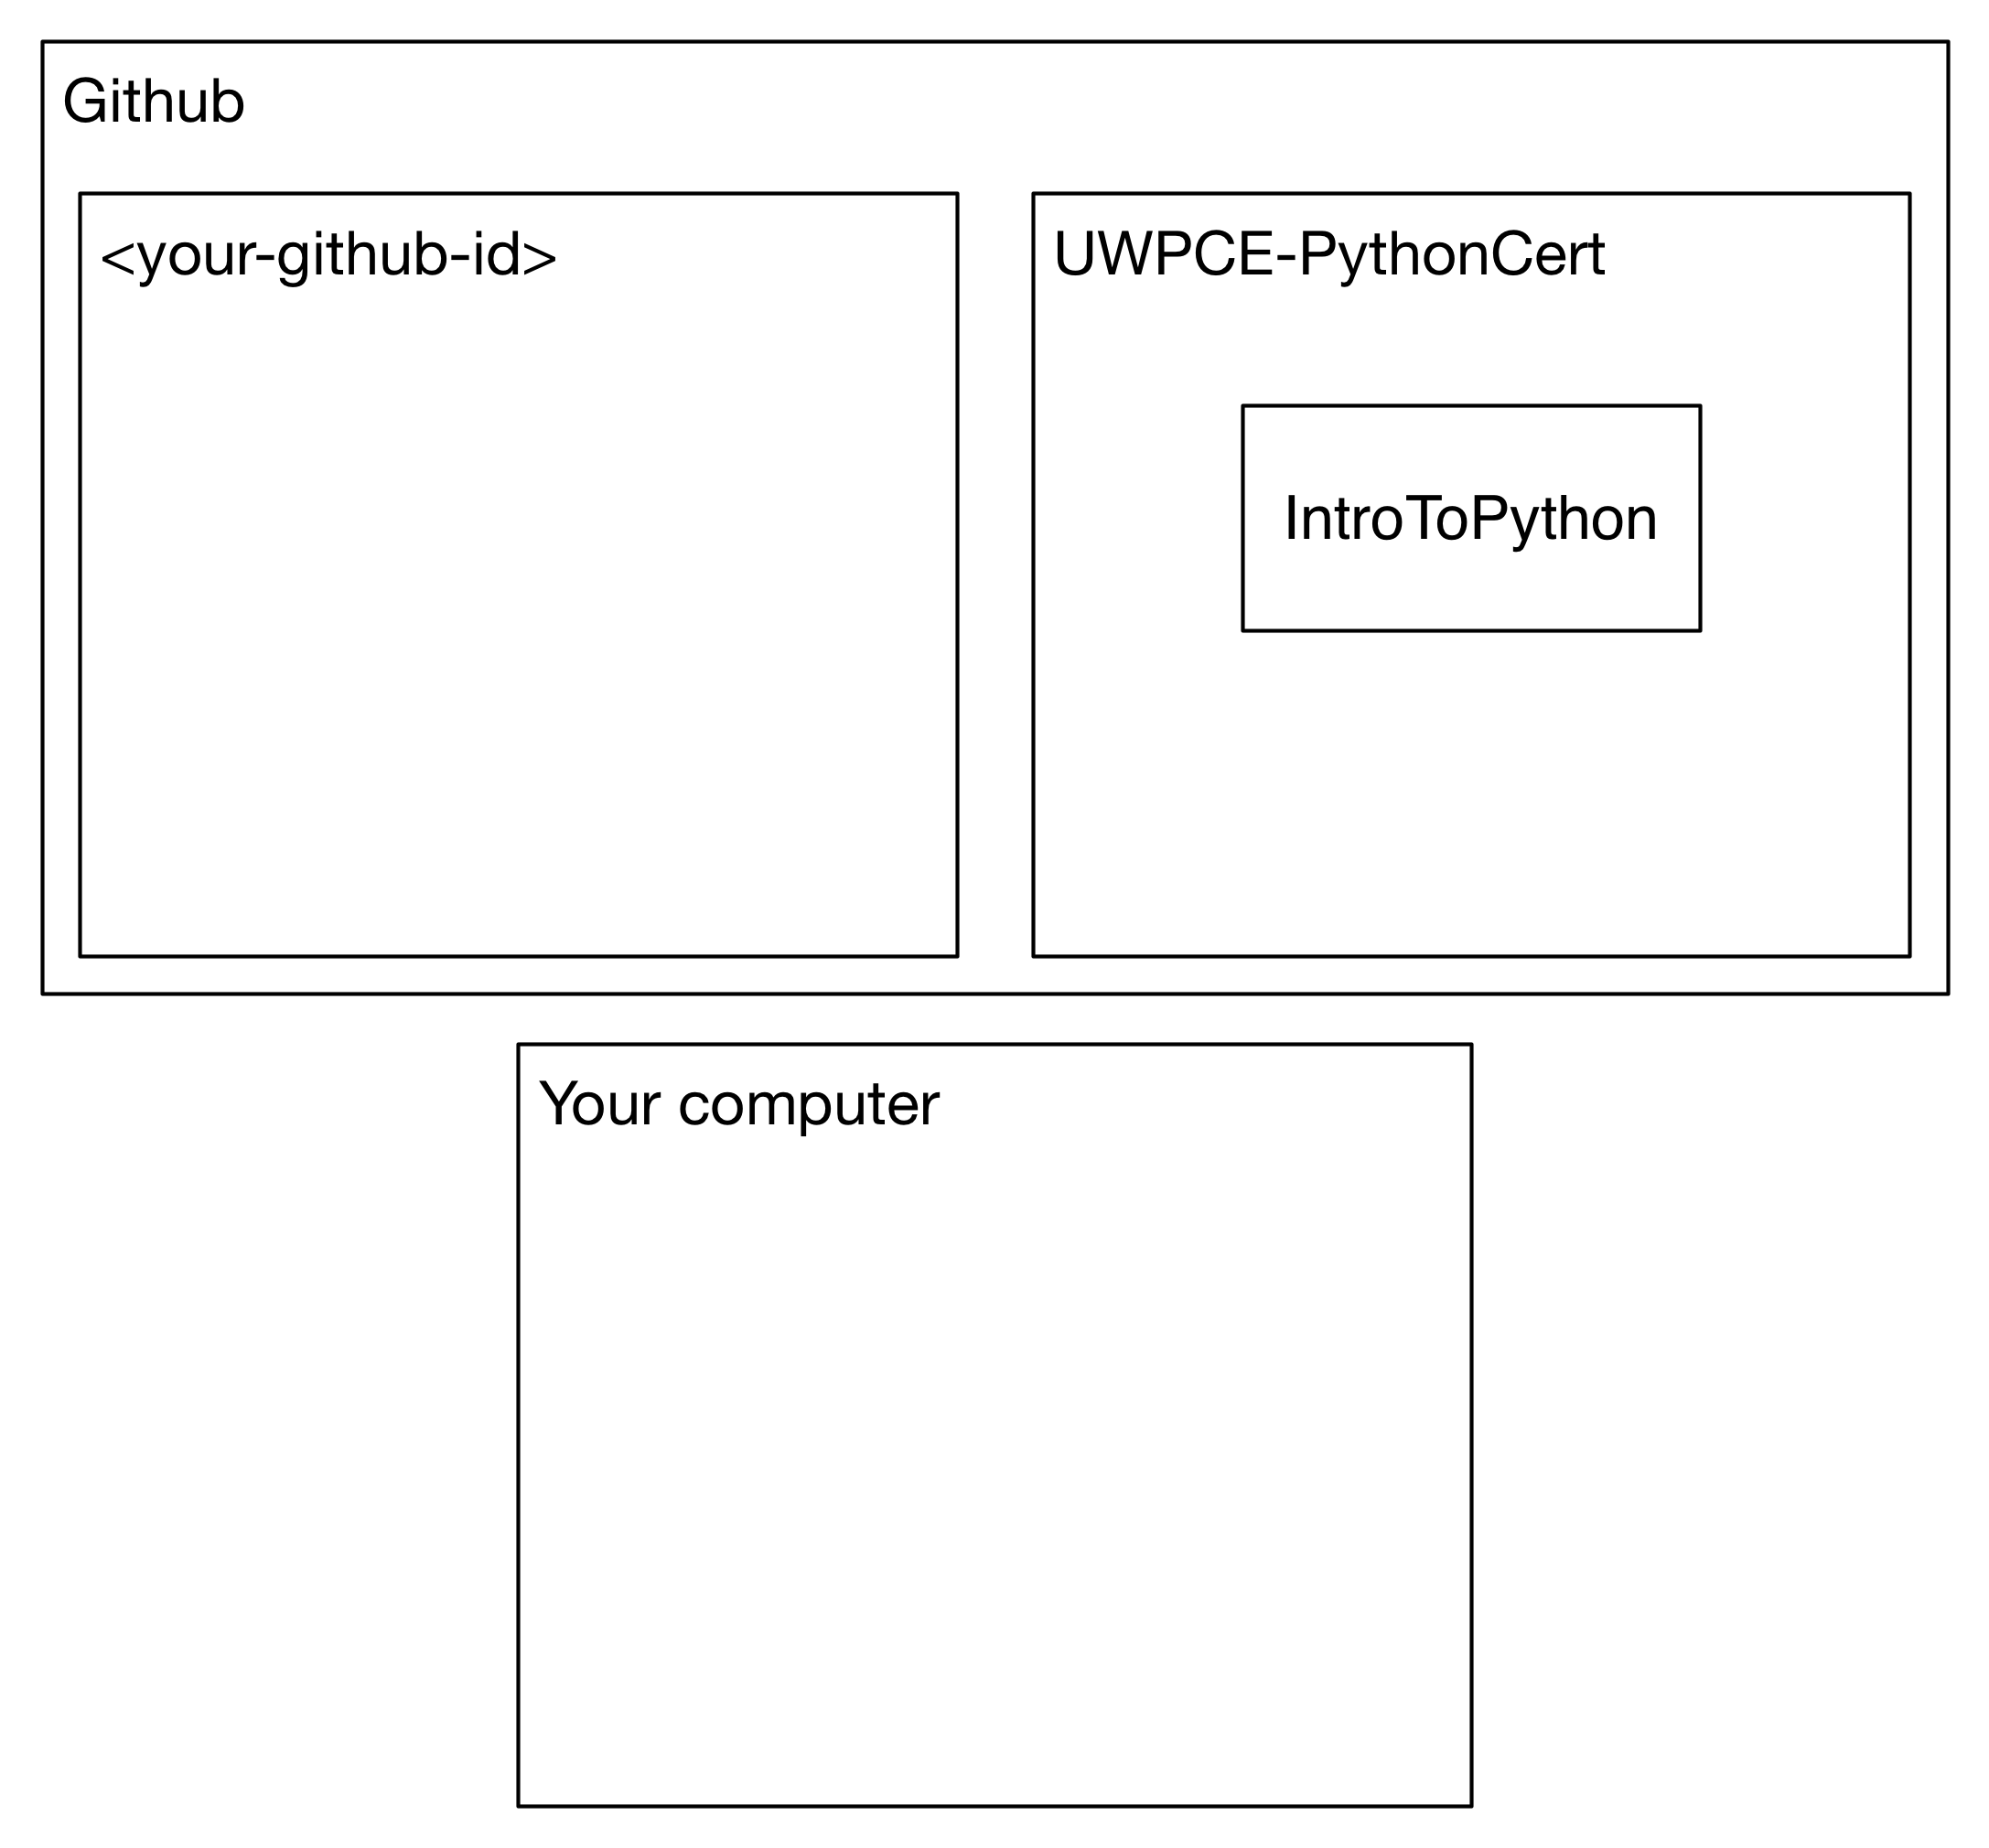
https://github.com/UWPCE-PythonCert-ClassRepos
Each class will have a repository created specifically for it, called something like: “Wi2018-Online”.
In examples below it is called YourClassRepoNameHere, so replace that in your head with the name of your class’ repository.
This class repository will include examples and relevant materials (and some exercise solutions) will be added throughout the class.
There will be a folder called students at the top level, and everyone will create their own directory within it.
Note that you can use any name you want for your personal working directory – it can be your first name, you full name, or maybe your gitHub handle if you want to remain anonymous. Just make sure you let your instructors know what name you’ve used so that they can credit you for your work.
Everyone will commit to this repository, and everyone will have access to everyone’s code.
This will make it easier to collaborate. Weirdly enough, collaborating is important for developing code, both for class and in the real world.
Setting up Your Fork of the Class Repository
The first thing we have to do is on the GitHub website. You will create a fork of the class repository from the UWPCE-PythonCert-ClassRepos account on GitHub into your personal account.
Before you can do that, you need to create a GitHub account, if you don’t have one already. Your gitHub id will be associated with this class’ public repo, so it is up to you if you want to use your real name for your gitHub account, or an alias to maintain your privacy.
Once you are logged in to your gitHub account, go to the appropriate class repository here:
https://github.com/UWPCE-PythonCert-ClassRepos
Make sure you find the right repo for YOUR class!
Once in the repo for your class, click on the “fork” button in the upper right of the page to create a fork in your gitHub account. You will now have a copy of the class repo, and can then set up your personal machine to connect to that copy.
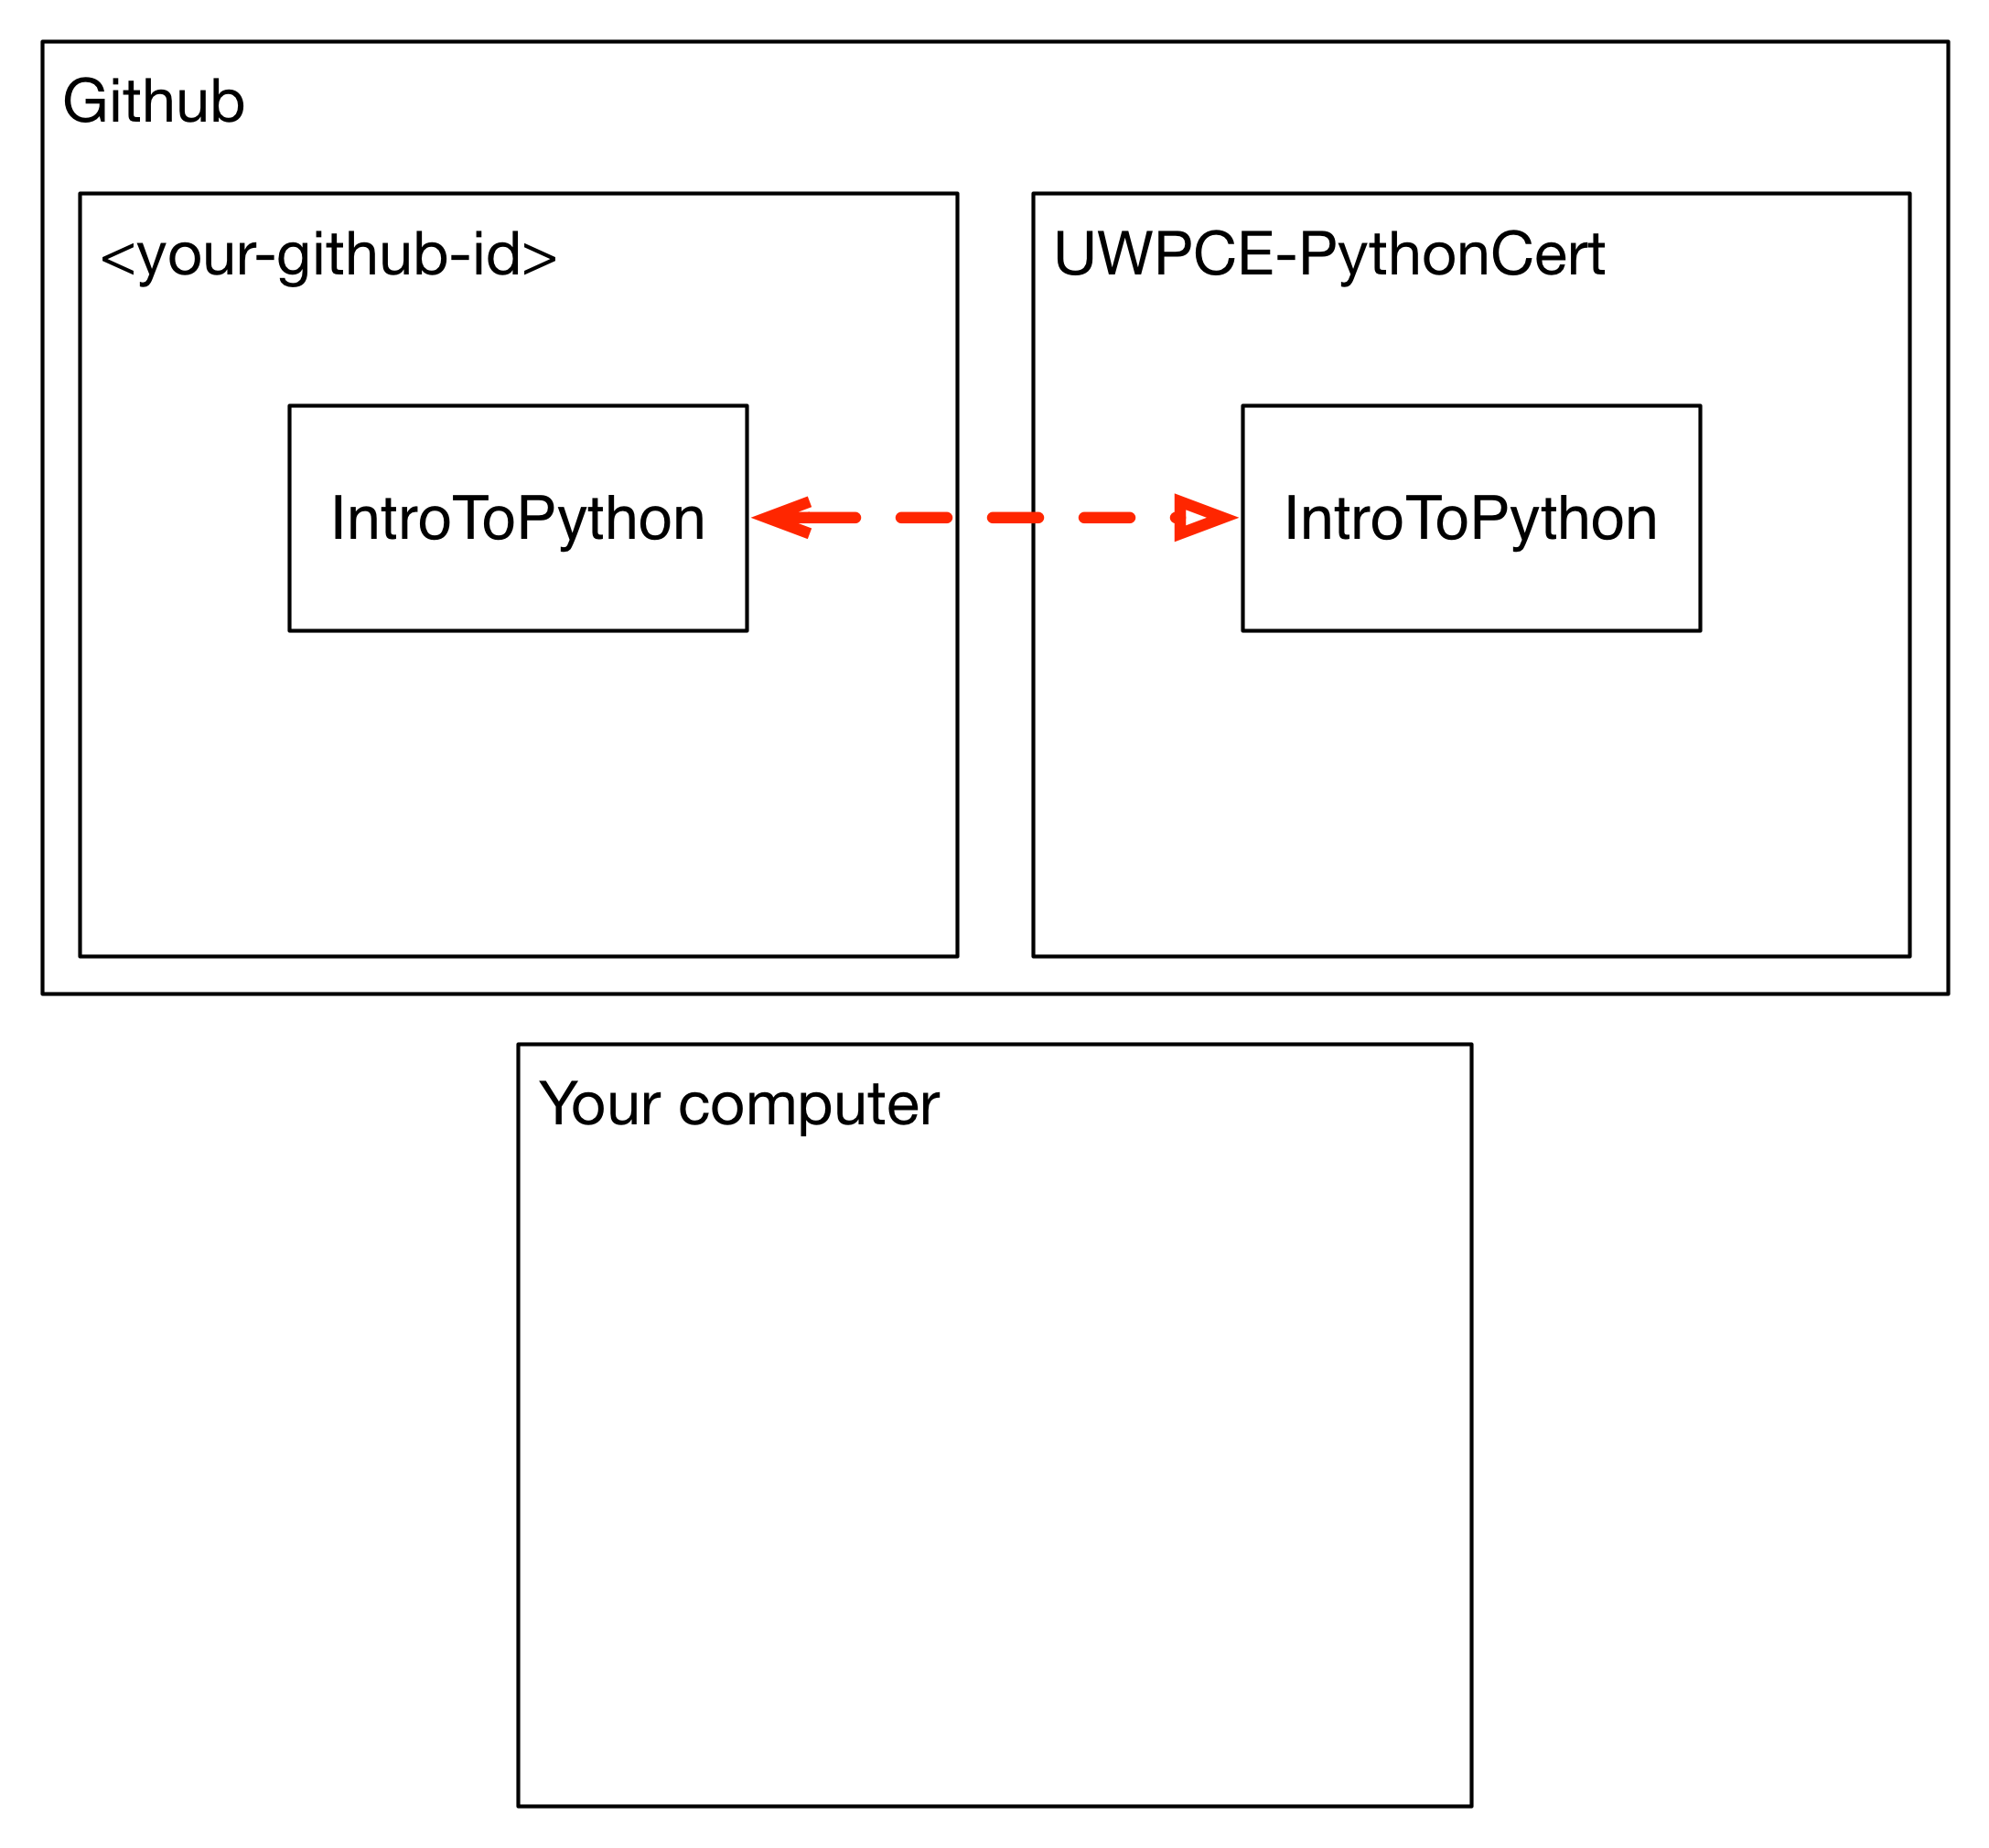
Yoy should now have a copy of the class repository in your account on the GitHub website.
The next step is to make a clone of your fork on your own computer, which means that your fork in GitHub is the origin:
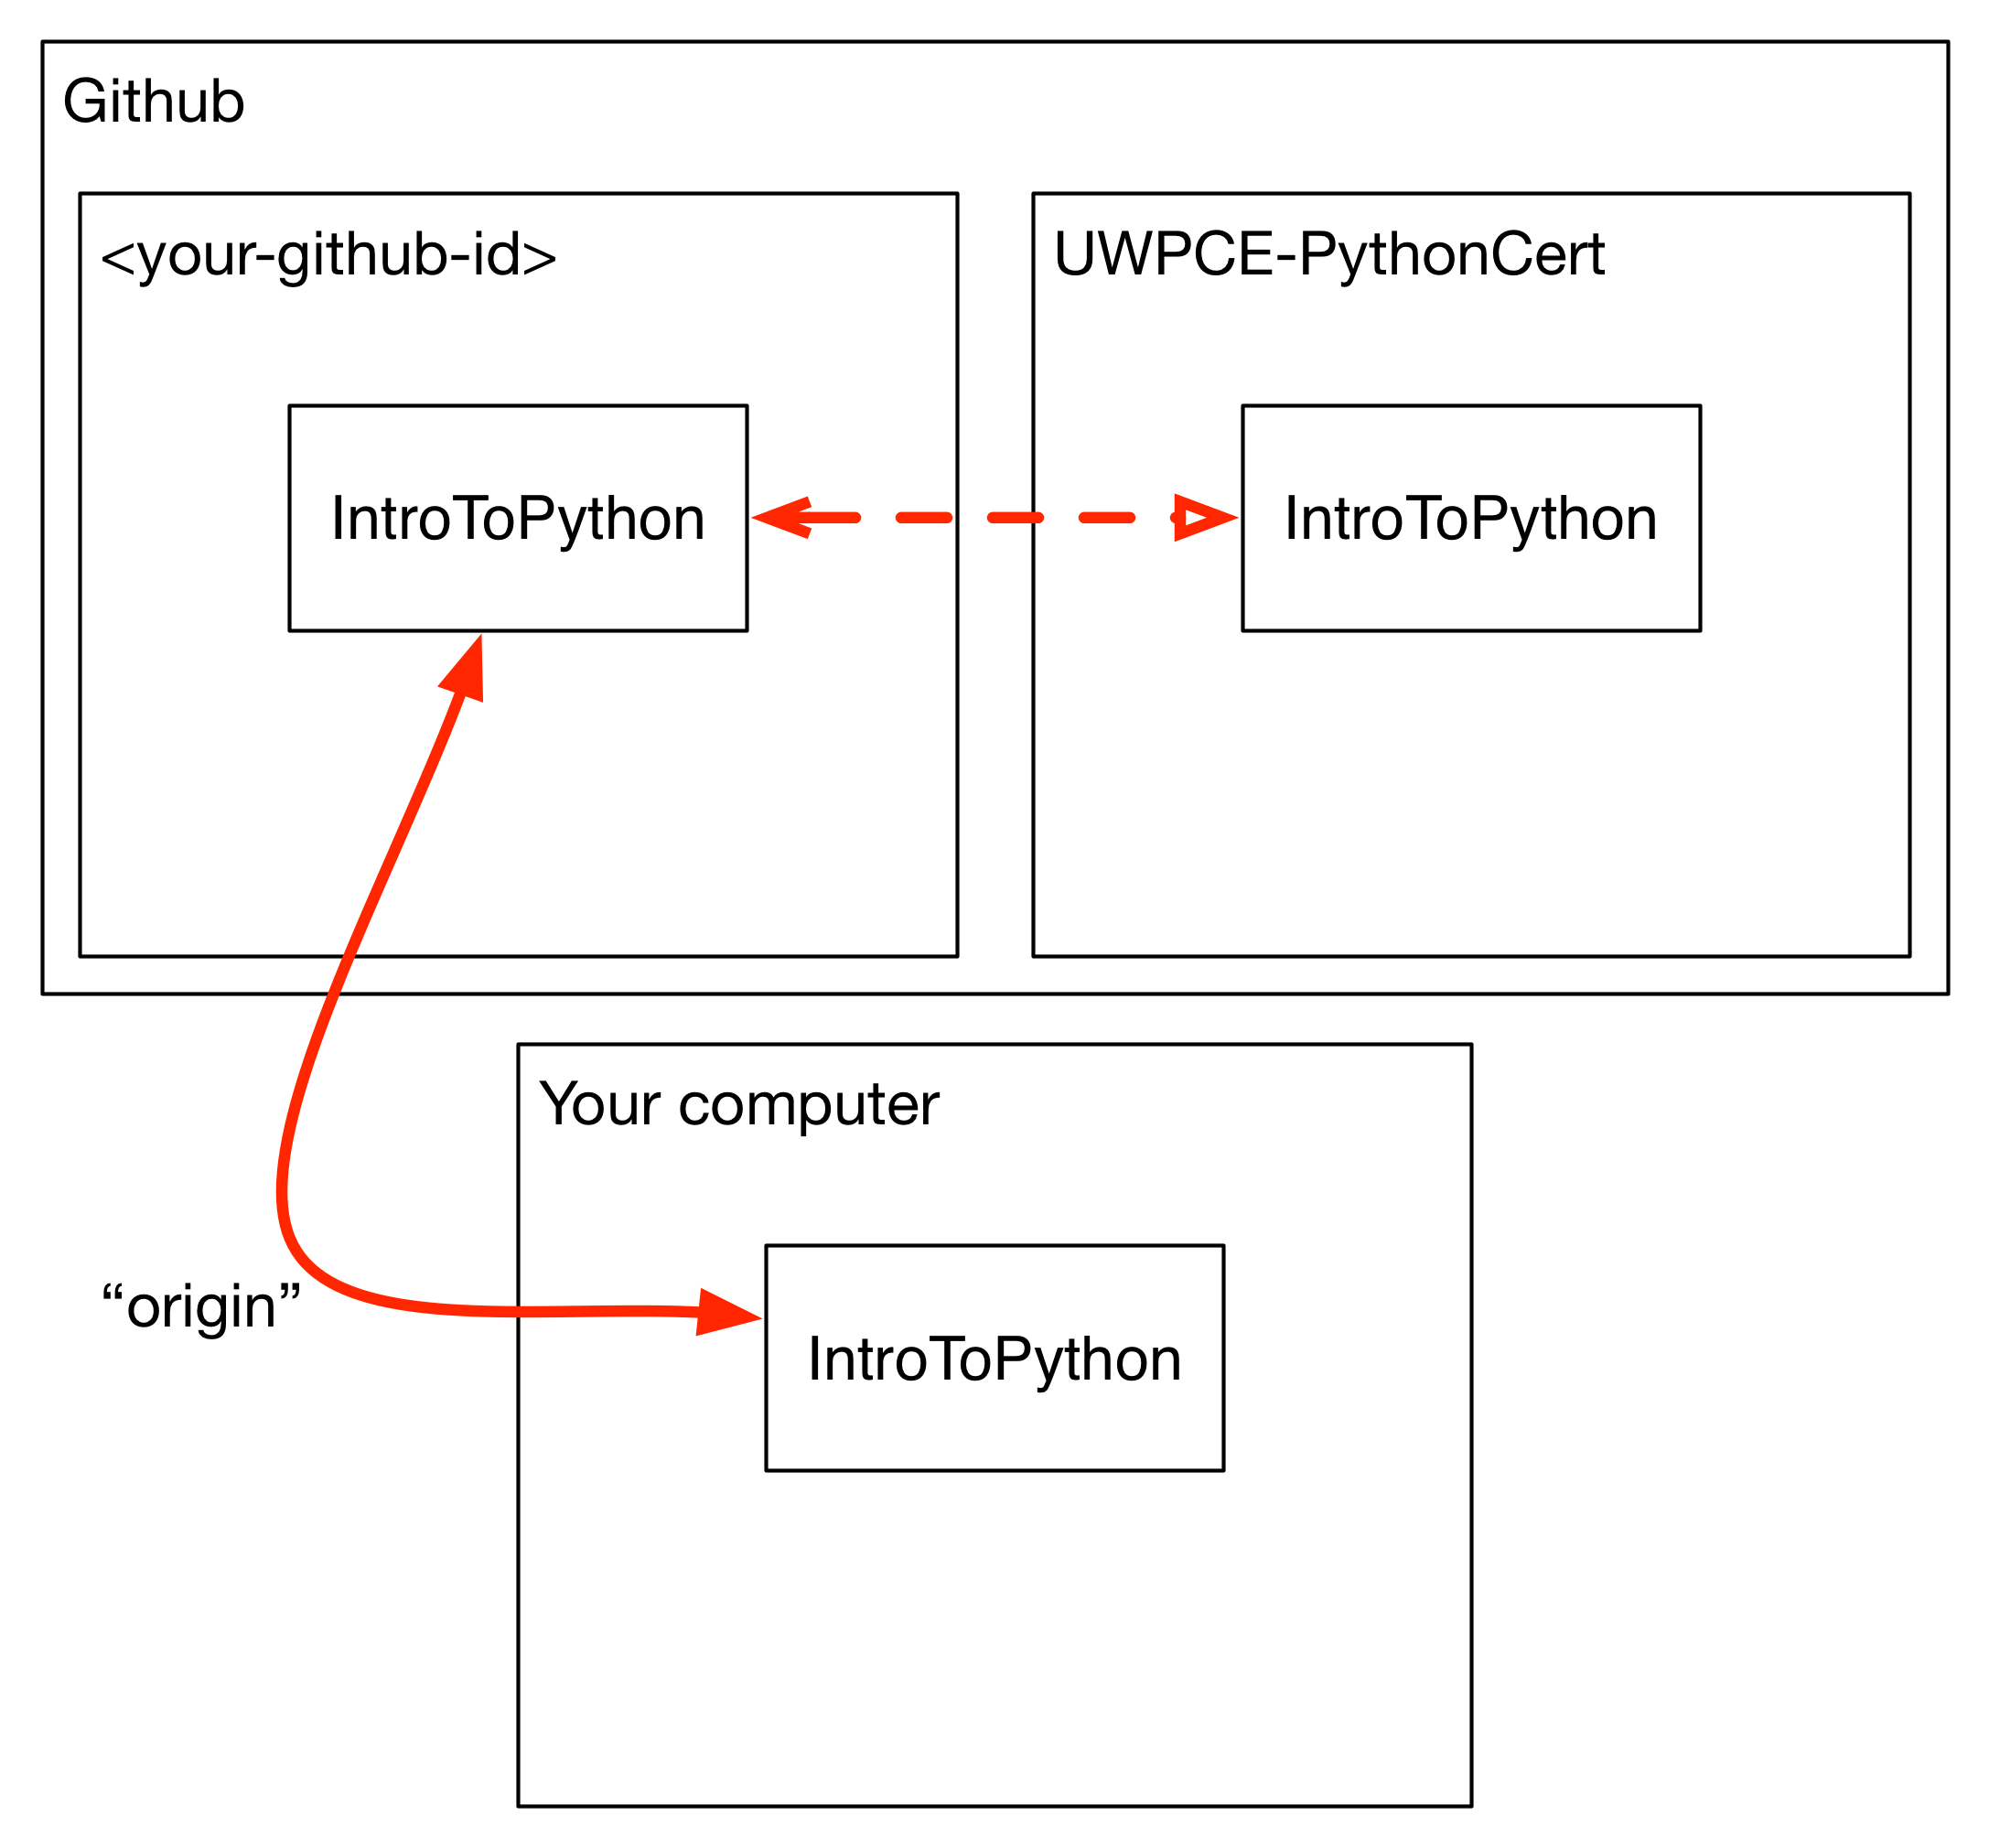
Begin in a directory on your computer where you want to keep your cloned version of the class repository. This can live anywhere on your file system but this outer directory should not be tracked in git.
From that directory, run
$ git clone https://github.com/your_github_id/YourClassRepoNameHere
Be sure to replace “YourClassRepoNameHere” with the name of your class repository (you can get the url by going to the class repo on gitHub and clicking “clone or download”).
This will download the repository from your GitHub account into the local directory that you ran the git clone command from.
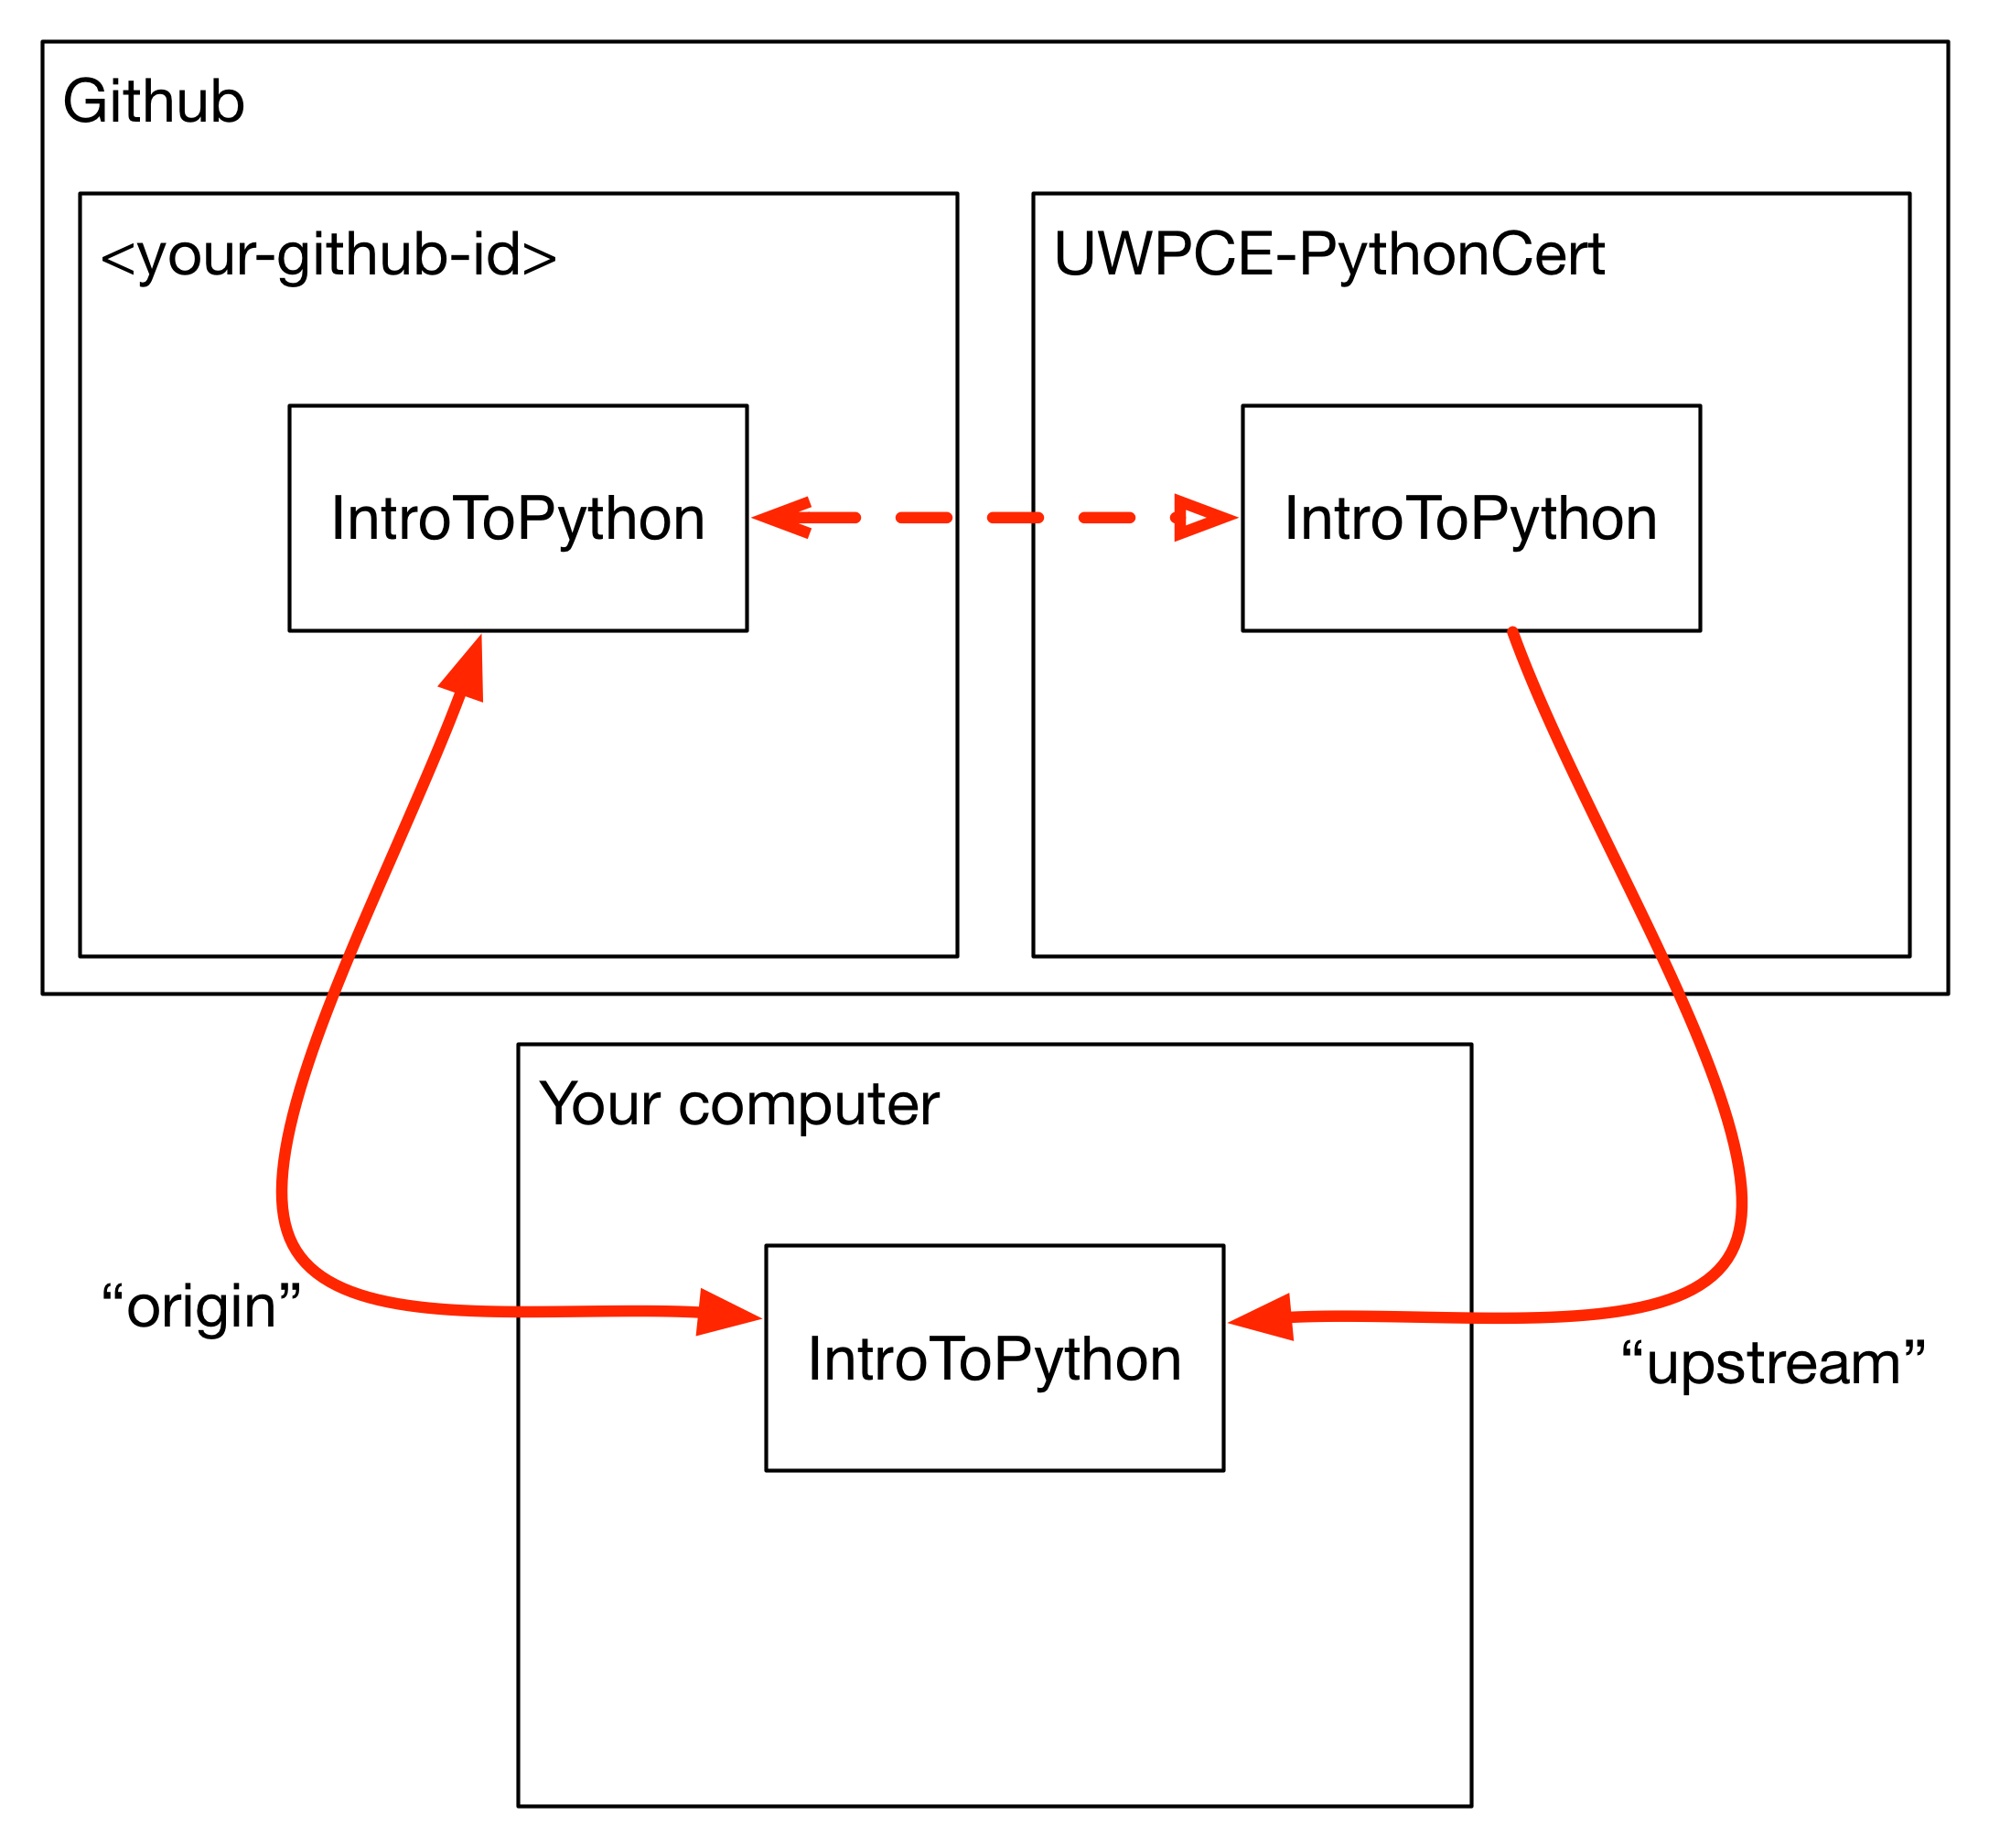
Adding a remote
Since you are working on a repository that you do not own, you will need to make a git shortcut to the original repository, so that you can get changes made by other contributors (i.e. the instructors and other students) before you start working.
You can add remotes at will, to connect your local repository to other copies of it in different remote locations.
This allows you to grab changes made to the repository in these other locations.
For this class, you will add an upstream remote to our local copy that points to the original copy of the material in the
UWPCE-PythonCert-ClassRepos account, and we will call it, appropriately, “upstream”.
Change directories into your local version of the class repository:
$ cd YourClassRepoNameHere
and run (remembering to use the name of your class):
$ git remote add upstream https://github.com/UWPCE-PythonCert-ClassRepos/YourClassRepoNameHere
You can get that full url by going to GitHub, finding the repo, and copying the “clone” url. then you can type the command, and simply paste the url.
Your local setup should now look something like this:
$ git remote -v
origin  https://github.com/your_github_id/YourClassRepoNameHere (fetch)
origin  https://github.com/your_github_id/YourClassRepoNameHere (push)
upstream    https://github.com/UWPCE-PythonCert-ClassRepos/YourClassRepoNameHere (fetch)
upstream    https://github.com/UWPCE-PythonCert-ClassRepos/YourClassRepoNameHere (push)
This should leave you in a situation that looks like this:
To get the updates from your new remote, you’ll need first to fetch everything:
$ git fetch --all
Fetching origin
Fetching upstream
...
Then you can see the branches you have locally available:
$ git branch -a
* master
  remotes/origin/HEAD -> origin/master
  remotes/origin/master
  remotes/upstream/master
Finally, you can fetch and then merge changes from the upstream master.
Start by making sure you are on your own master branch:
$ git checkout master
This is really really important. Take the time to ensure you are where you think you are, in other words, that your origin is your own GitHub repository and that you are working on master from that remote. You can use git remote -v and git branch -a to verify.
Now, fetch the upstream master branch and merge it into your master. You can do this in one step with:
$ git pull upstream master
Updating 3239de7..9ddbdbb
Fast-forward
 Examples/README.rst              |  4 ++++
...
 create mode 100644 Examples/README.rst
...
Now all the changes from upstream are present in your local clone. You should do this pull every time you start to work on code.
In order to preserve the changes made by others in your fork on GitHub, you’ll have to push:
$ git status
On branch master
Your branch is ahead of 'origin/master' by 10 commits.
  (use "git push" to publish your local commits)
$ git push origin master
Counting objects: 44, done.
...
$
(A simple git push will usually do the right thing)
You are now set up to work with this repository, and the next steps will be similar every time you work on code.
Go now to this page: git Workflow, where you will learn what to do each time you have work to submit for review.
Privacy Note:
Because of the way we have set up the class, you will be able to see all work submitted to us from everyone in the class in the students directory on your machine. This is not a bad thing. And the files tend to be small.
We encourage sharing of knowledge in this class. Helping your fellow students will also help you to better understand. Share your code, and get used to giving / receiving feedback on how to improve your code, if you are not already.
However, you are free to use any name you like for your working directory – it does not have to be your real name, if you want to keep your privacy.
Structure of multiple git repos
Each repository will have a directory called .git that is normally
not seen. This directory is how git keeps track of everything. Leave it alone. :)
Please do not set up a git repository inside another git repository, this can lead to heartache.
Absolutely, do NOT set up a git repository in your home root directory. This will put everything in your home directory up on GitHub, and you do not want that.
Setting up new repositories can be confusing because when you clone a git repository it creates the directory that will be the repository, but when you are creating a new repository, you need to first be IN the directory in which you want the repository to be rooted. Please ask if this does not make sense.
It’s also important to note that you do not run the $ git init command at any point in the process of cloning and configuring your local copy of a remote repo. The init git command is used to initialize a git repository on your local machine and is not necessary in our case because the cloned repository has already been initialized.
Additional Resources:
git tutorial: https://try.github.io/levels/1/challenges/1
basic git commands: https://confluence.atlassian.com/bitbucketserver/basic-git-commands-776639767.html